Installing a mini green house can be a rewarding project that allows you to extend your growing season, protect delicate plants, and create a controlled environment for gardening. As a mini green house supplier, I have helped many customers with the installation process, and I'm excited to share my knowledge and tips with you.
Planning Your Mini Green House Installation
Before you start the installation process, it's essential to plan carefully. Consider the following factors:
Location
Choose a location that receives plenty of sunlight, preferably at least six hours of direct sunlight per day. Avoid areas that are prone to strong winds, as this can damage the structure. Also, ensure that the ground is level and well-drained to prevent waterlogging.
Size and Type
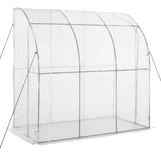
There are various sizes and types of mini green houses available, including freestanding, lean-to, and portable models. Consider your gardening needs, available space, and budget when selecting the right one for you. You can explore our range of Mini Green House options to find the perfect fit.
Permits
Check with your local authorities to see if you need any permits or approvals for installing a mini green house. Some areas may have specific regulations regarding the size, location, and construction of structures on your property.
Gathering Your Tools and Materials
Once you have planned your installation, it's time to gather the necessary tools and materials. Here's a list of items you'll likely need:
Tools
- Tape measure
- Level
- Drill
- Screwdriver
- Hammer
- Pliers
- Safety glasses
- Gloves
Materials
- Mini green house kit (including frame, panels, and accessories)
- Concrete blocks or footings (if required)
- Anchors or stakes
- Sealant
- Silicone caulk
Preparing the Site
Before you start assembling the mini green house, you need to prepare the site. Follow these steps:
Clear the Area
Remove any grass, weeds, rocks, or debris from the installation area. This will ensure a clean and level surface for the green house.
Level the Ground
Use a tape measure and a level to check the ground for levelness. If the ground is uneven, you may need to add or remove soil to create a level surface. You can also use concrete blocks or footings to provide a stable base for the green house.
Mark the Layout
Use a tape measure and stakes to mark the layout of the green house on the ground. This will help you ensure that the green house is installed in the correct position and alignment.
Assembling the Mini Green House
Now that the site is prepared, it's time to start assembling the mini green house. Follow the manufacturer's instructions carefully, as the assembly process may vary depending on the model and brand. Here are some general tips to keep in mind:
Read the Instructions
Before you start assembling the green house, read the instructions thoroughly. Make sure you understand all the steps and have all the necessary tools and materials.
Organize the Parts
Sort and organize the parts and components of the green house before you start assembling them. This will make the process easier and more efficient.
Follow the Sequence
Assemble the green house in the order specified in the instructions. This will ensure that the structure is stable and secure.
Use the Right Tools
Use the tools recommended in the instructions to assemble the green house. Using the wrong tools can damage the parts and affect the quality of the installation.
Check for Alignment
As you assemble the green house, check for alignment and levelness. Use a level to ensure that the frame is straight and the panels are properly installed.
Installing the Panels
Once the frame of the mini green house is assembled, it's time to install the panels. Follow these steps:
Clean the Panels
Before you install the panels, clean them with a mild detergent and water. This will remove any dirt, dust, or debris and ensure a clear view inside the green house.


Apply Sealant
Apply a bead of sealant around the edges of the frame where the panels will be installed. This will help prevent water leakage and improve the insulation of the green house.
Install the Panels
Carefully place the panels into the frame, making sure they fit snugly. Use the clips or fasteners provided in the kit to secure the panels to the frame.
Check for Gaps
After the panels are installed, check for any gaps or spaces between the panels and the frame. If you find any gaps, use silicone caulk to seal them.
Securing the Mini Green House
To ensure the stability and durability of the mini green house, it's important to secure it properly. Follow these steps:
Install Anchors or Stakes
If the green house is not attached to a foundation, install anchors or stakes to secure it to the ground. This will help prevent the green house from being blown away by strong winds.
Use Guy Wires
For larger or freestanding green houses, you may need to use guy wires to provide additional support. Attach the guy wires to the top of the green house and secure them to the ground using stakes.
Check the Stability
After the green house is secured, check its stability by gently pushing on it from different angles. If the green house feels unstable, adjust the anchors or stakes as needed.
Finalizing the Installation
Once the mini green house is assembled and secured, it's time to finalize the installation. Follow these steps:
Clean the Interior
Clean the interior of the green house to remove any dirt, dust, or debris. This will create a clean and healthy environment for your plants.
Install Shelving and Benches
Install shelving and benches inside the green house to provide additional space for your plants. You can choose from a variety of options, including wooden, metal, or plastic shelves and benches.
Connect the Water Supply
If you plan to use a watering system in your green house, connect the water supply and test it to ensure it works properly.
Add Plants
Finally, it's time to add your plants to the green house. Choose plants that are suitable for the growing conditions inside the green house, such as tomatoes, peppers, herbs, and flowers.
Conclusion
Installing a mini green house is a fun and rewarding project that allows you to enjoy gardening year-round. By following the steps outlined in this guide and using the right tools and materials, you can install a mini green house that is stable, durable, and functional. If you have any questions or need further assistance, please don't hesitate to contact us. We are a leading supplier of Mini Green House, Small Home Greenhouse, and Small Metal Greenhouse solutions, and we are here to help you with your gardening needs. Whether you are a beginner or an experienced gardener, we have the expertise and products to help you create the perfect green house for your plants. Consider getting in touch for more information and to discuss your procurement requirements with our team.
References
- Gardening Know How. (n.d.). How to Build a Greenhouse. Retrieved from [Website URL]
- Almanac.com. (n.d.). Building a Greenhouse. Retrieved from [Website URL]
- Royal Horticultural Society. (n.d.). Greenhouses and Polytunnels. Retrieved from [Website URL]